Baked Doughnuts with Chocolate Glaze
Very soft enriched doughnuts that do not need frying. Baked in the oven, these doughnuts are lighter than deep-fried ones. The dough in this recipe is very successful, easy to work with, and the doughnuts turn out wonderfully airy.
Updated : 21 May, 2026
Easy
More than 1 hour.
Ingredients

500 grams
Wheat flour

200 milliliters
Milk

10 grams
Dry yeast

1
Eggs

100 grams
Sugar

50 grams
Butter

0.5 teaspoon
Salt

to taste
Vanillin
1 sluoksnis
50 milliliters
Milk
50 grams
Sugar

4 tablespoon
Cocoa
50 grams
Butter
Table
Table of volume measurements:
- teaspoon - 5 ml
- dessert spoon - 10 ml
- tablespoon - 20 ml
- glass - 200 ml
Preparation
Step 1
How do you make baked doughnuts with chocolate glaze in the oven? Prepare the ingredients for the doughnuts. Take the egg and butter out of the refrigerator in advance so they can come to room temperature. This is important when making yeast dough, so the yeast works actively and makes it rise. If the ingredients are cold, or on the contrary too hot, the yeast will either not activate or will die.
Step 2
Warm the milk until it is just warm. It should feel pleasantly warm, but not hot, so it does not kill the living organism, the yeast. Pour the yeast into the milk and leave it for 10 minutes. This is not a sponge. The yeast will not activate and start working yet. This step is needed only to dissolve it. Sugar is needed for activation.
Step 3
Add the egg to the milk, then add the sugar, salt, and vanilla. Mix with a whisk.
Step 4
Sift all the flour into the milk mixture. Sifting the flour fills it with air, which makes baked goods softer and airier.
Step 5
Begin kneading the dough by mixing the mass with a spoon.
Step 6
Add the soft butter and start kneading by hand. At first, the dough will be sticky, but gradually it will become smooth, uniform, and stop sticking to everything. This will take about 10 minutes. In the process, I needed a little flour beyond the stated amount, literally just a couple of tablespoons. The gram measurement here is fairly precise, but there can be small differences.
Step 7
When the dough finally pulls away from the sides, gather it into a ball. Cover the bowl with a towel, lid, or plastic wrap and leave it to rise for about 1 hour.
Step 8
After 1 hour, the dough should have doubled in size. If that has not happened, give it a little more time, about another 30 minutes. If the dough still has not risen after that, it means your yeast did not activate.
Step 9
Turn the risen dough out onto a lightly floured work surface. Next comes the stage of shaping the doughnuts. You can roll the dough into a sheet and cut out doughnuts with a glass, then cut the center with a small shot glass. That will give you neater doughnuts, but you will have a lot of leftover dough. I chose a more economical method. I divided the dough into equal pieces and then rolled each into a ball. I got 16 pieces.
Step 10
Take one piece and make a hole in the center, stretching and shaping the future doughnut.
Step 11
Place the doughnuts on a baking sheet lined with parchment paper. Cover with a towel and leave for 20 minutes. During this time, the dough will proof, which will make the finished pastries fluffier and more tender.
Step 12
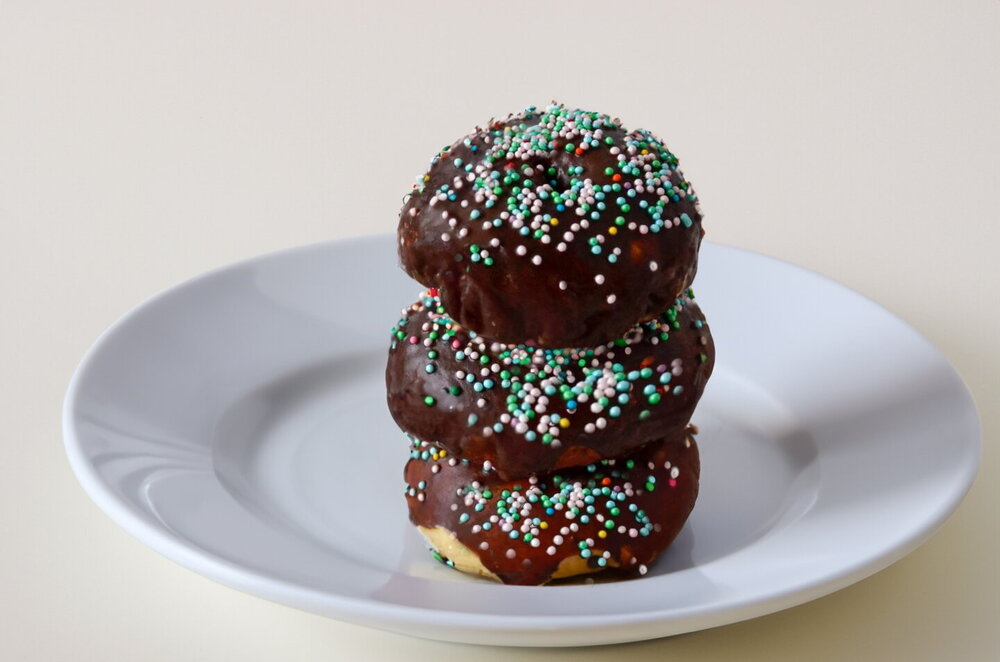
Bake the doughnuts in an oven preheated to 190°C (375°F) for 15-20 minutes using the top-and-bottom heat setting. The hole in the middle almost disappeared, because the doughnuts rose very strongly during baking.
Step 13
While the doughnuts are cooling, prepare the glaze. Take the ingredients for it.
Step 14
Put the sugar and cocoa into a small saucepan and pour in the milk. Place it over low heat and, stirring constantly, wait until the sugar and cocoa dissolve. Add the butter to the saucepan.
Step 15
Continue heating the mixture until it is hot, but do not boil it, because the butter may separate. Stir until smooth, then cool it well.
Step 16
Dip the cooled doughnuts, one side at a time, into the glaze using a fork. Decorate the tops however you like. I sprinkled mine with confectionery sprinkles.
Author note
Share the recipe
